In this fast-paced world, notes play a vital role in everyone’s life. People prefer writing their quick thoughts, or any valuable information that they don’t want to forget in notes and keep the notes with them anytime and anywhere.
However, like any other data, we can also lose these notes, which may cause many troubles for us. It's best if you have backed up your notes somewhere else. However, if you haven't, it cannot be very pleasant. But don't be too worried, we are here exactly to assist you to recover permanently deleted notes on iPhone. Read this article, and your problem will be solved.

Solution 1: Recover Permanently Deleted Notes With iFindit Without Backup
Solution 2: Recover Deleted Notes From Your Mail Accounts
Solution 3: Recover Deleted Notes From iCloud Backup
Solution 4: Recover Deleted Notes From iTunes Backup
Solution 1: Recover Permanently Deleted Notes With iFindit Without Backup
iFindit is an all-round tool that can help recover notes without backup. It can recover data lost due to any reason. Whether your screen is broken, your phone is factory reset, get lost, or in disabling conditions, etc., you can recover the lost data through iFindit. This is the most straightforward way to retrieve your data.
Moreover, iFindit stands out in the crowd because of its impeccable features, such as:
- You can retrieve you deleted notes without backup.
- You can preview your notes before recovering.
- You can select notes that you want to recover.
- You can get back your note with just a simple and 1-click process.
- You are provided a highly effective recovering experience with a quick scan speed.
Secure Download
You can't download this on your phone. Download it on your desktop to recover your data.
Steps To Recover Notes Through iFindit
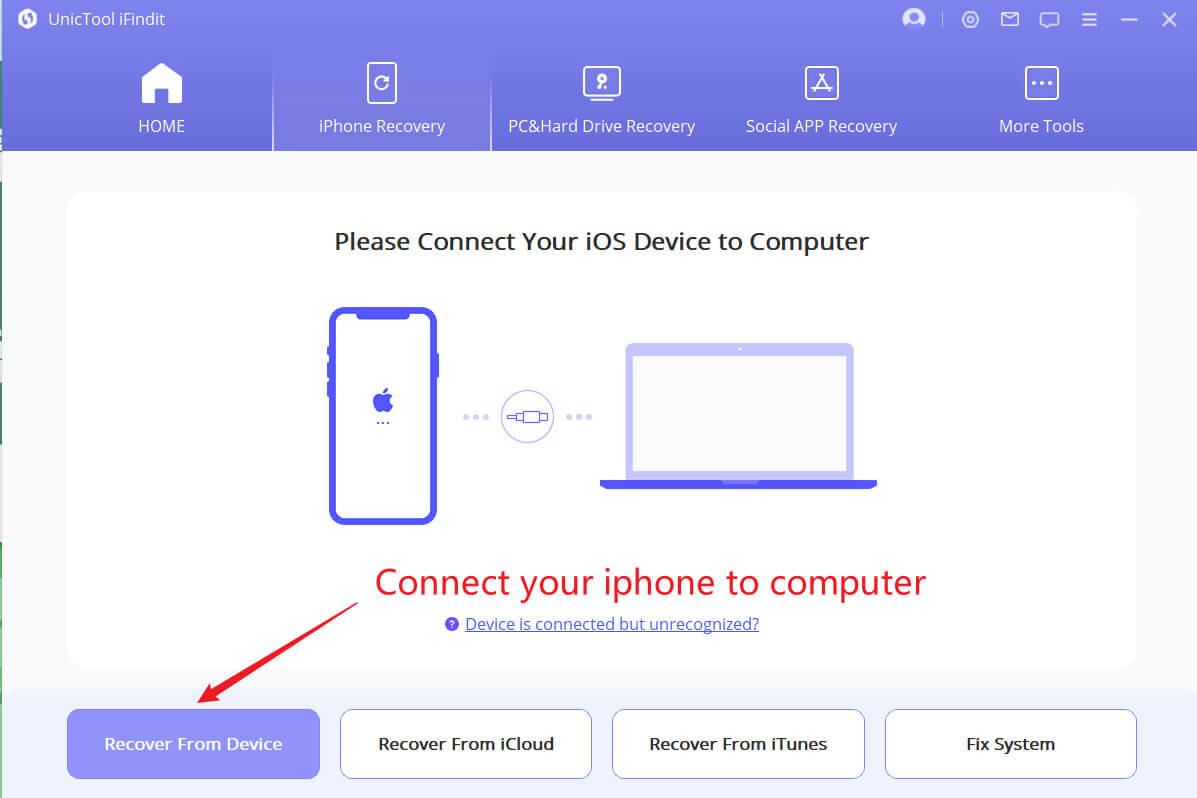
- 1 The first step is to launch the iFindit software on your computer and choose the "Recover from IOS Device" mode. When you're done with this, connect your device to the computer with your lightning cable.
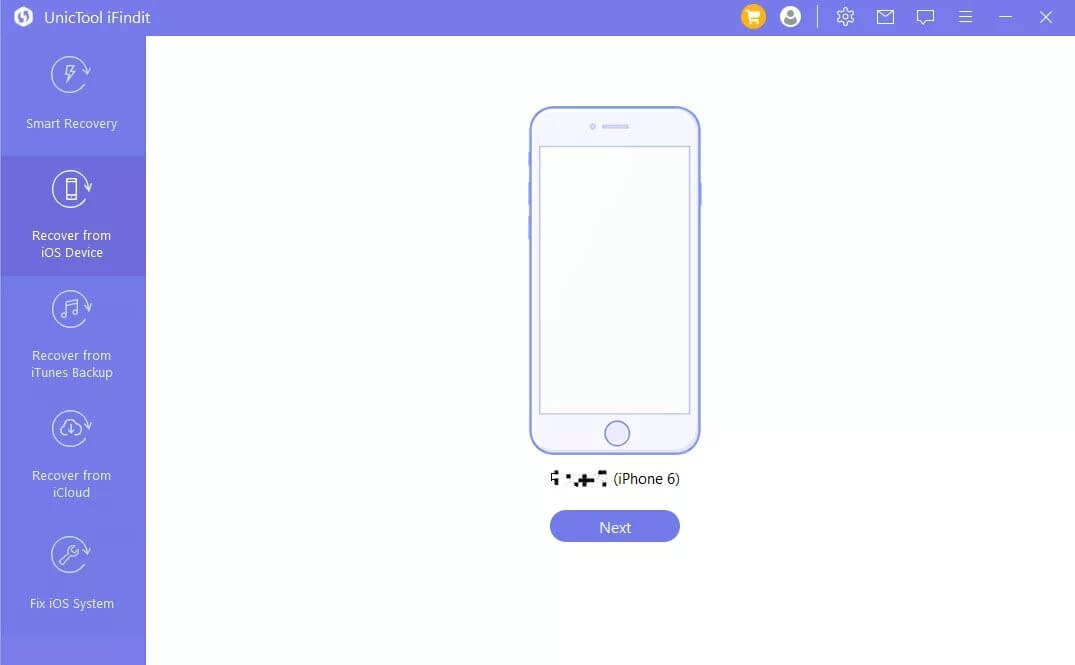
- 2 Click on the "Next" when the software successfully detects your device.
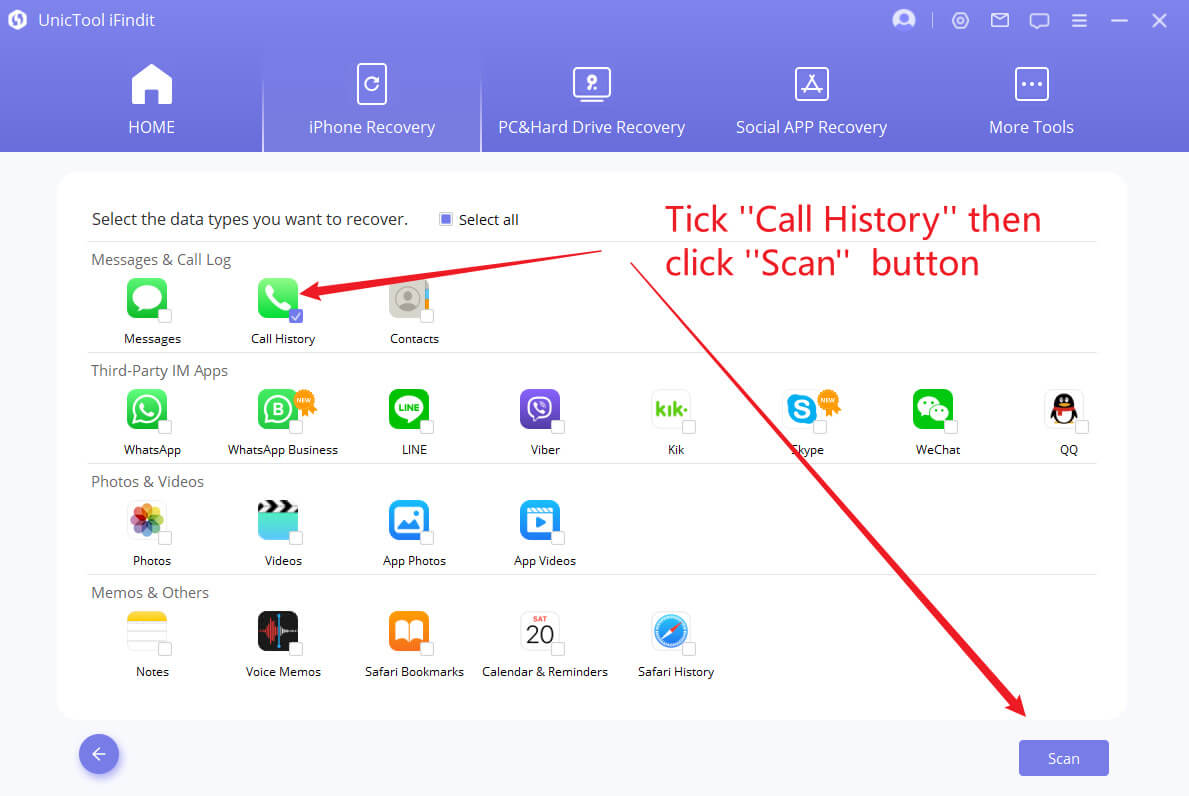
- 3 Now, select the lost data type such as "Notes" on your device, and click on the "Scan" button..
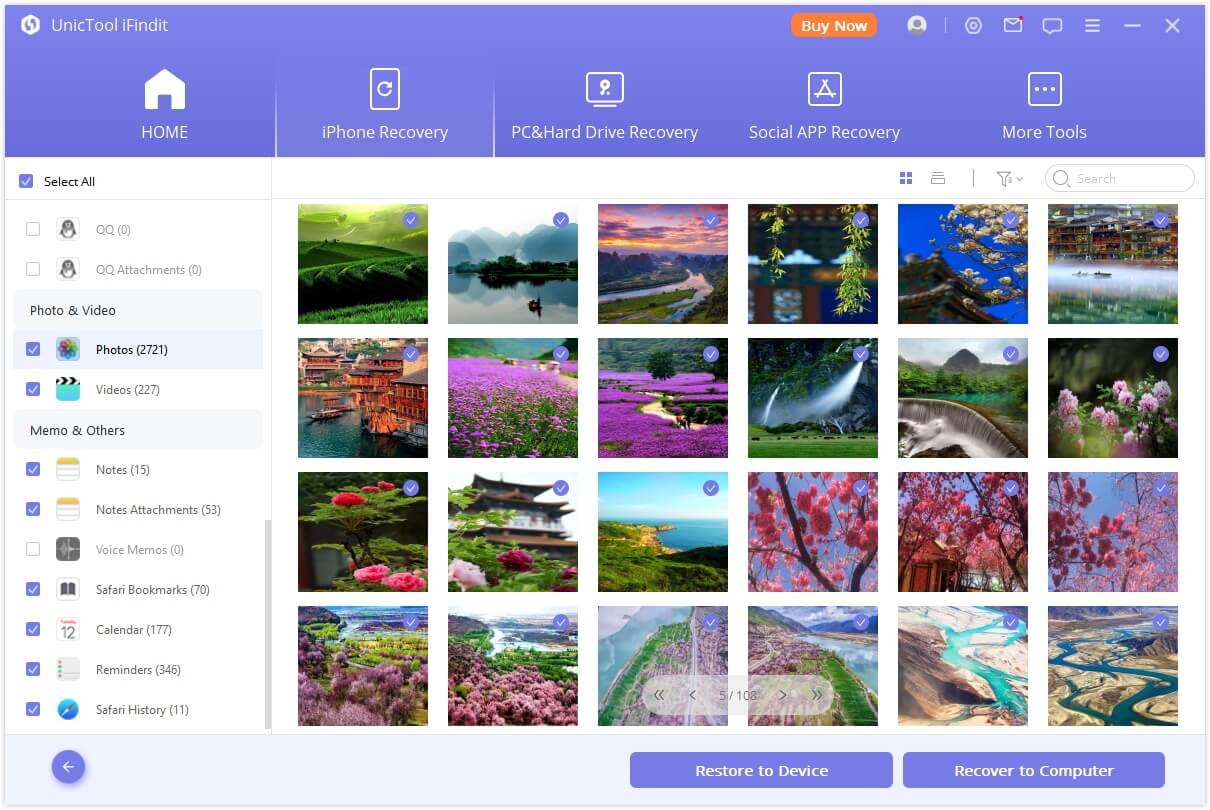
- 4 After a while, everything will show up on the screen, and click on "Recover" to get back your lost notes. You can choose a location to store the lost data, and voila! Your lost notes are recovered!
Solution 2: Recover Deleted Notes From Your Mail Accounts
Sometimes, people have backed up their notes and other apps' data with their mail accounts. And this proves to be a great guardian in the problematic situation as you can recover your notes using mail accounts very quickly!
Steps To Recover Your Lost Data from Mail Accounts
- Launch the settings app on your iPhone and choose the mail menu from there.
- Click on the "Accounts" button and it will lead you to the mail service you use, i.e., Gmail, Yahoo, or iCloud. Choose the one which you are using.
- Tap on the "Notes" toggle from the menu items and then go to the Note app to refresh your notes.
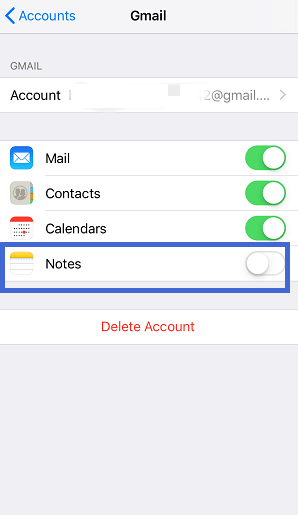
These steps will help recover the notes you have accidentally deleted from your iPhone. But to be sure in the future, select iCloud as the default account on your iPhone.
This method can be effective only if you have synced your notes with your mail account. Also, these steps are for Gmail. You can follow quite the same steps to find your notes on other mailing apps if you're using any other.
Solution 3: Recover Deleted Notes From iCloud Backup
Recovering deleted notes from an iPhone is not a big dilemma when you have already backed up your important stuff in iCloud. So, you can recover your notes using the next mentioned steps through iCloud backup.
Steps To Recover Deleted Notes From iCloud
Your other data may get deleted while recovering your notes using this method. Therefore, remember to back up your existing data before restoring your notes.
- The first step is to go over "Settings". From settings, click on ‘General’ and then on "Reset". There you have to click on "Erase All Content and Settings".
- The next step is to click on the "Restore from iCloud Backup", and then you will have to sign in with your Apple ID.
- You have to select a backup that carries your deleted notes from the list that appears on the screen.
- Lastly, wait for the process to be completed and you will enjoy your notes again!
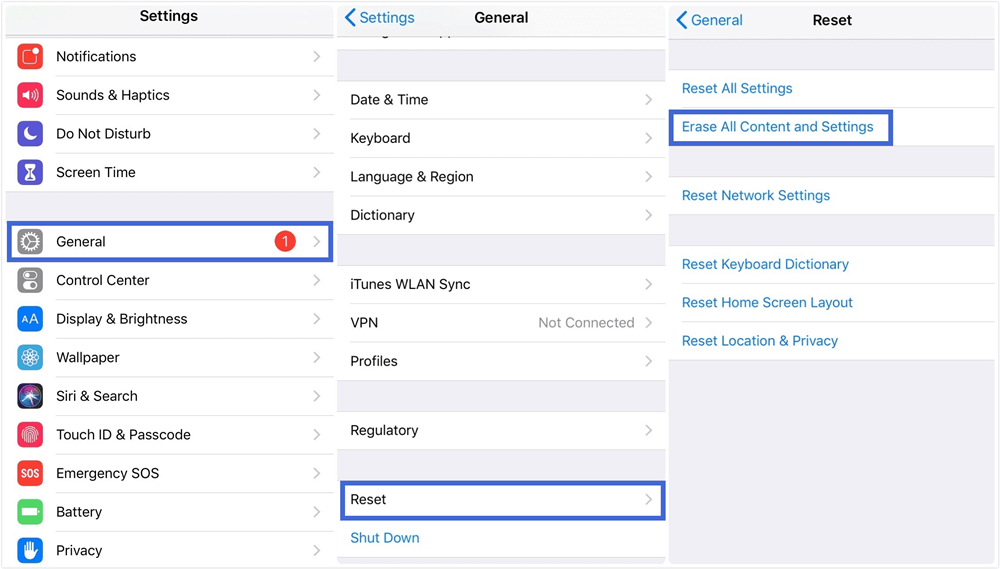
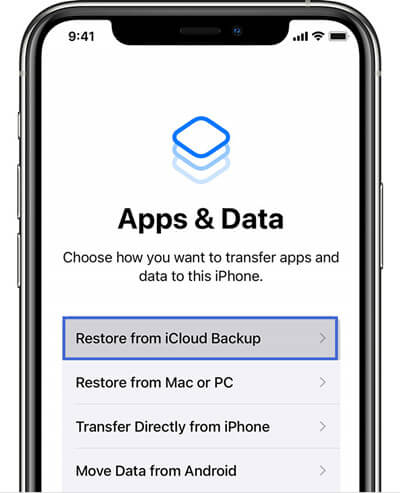
You can also recover your recently deleted notes from iCloud.com, as they stay for 30 days after deletion.
Steps To Recover Deleted Notes From iCloud.com
- Open iCloud.com on your device, and log in to your Apple account.
- You’ll see several menu options on the home screen, locate Notes and click them.
- In the subsequent menu, tap the "Recently Deleted" folder.
- Tap the "Recover" button and give it a few seconds.
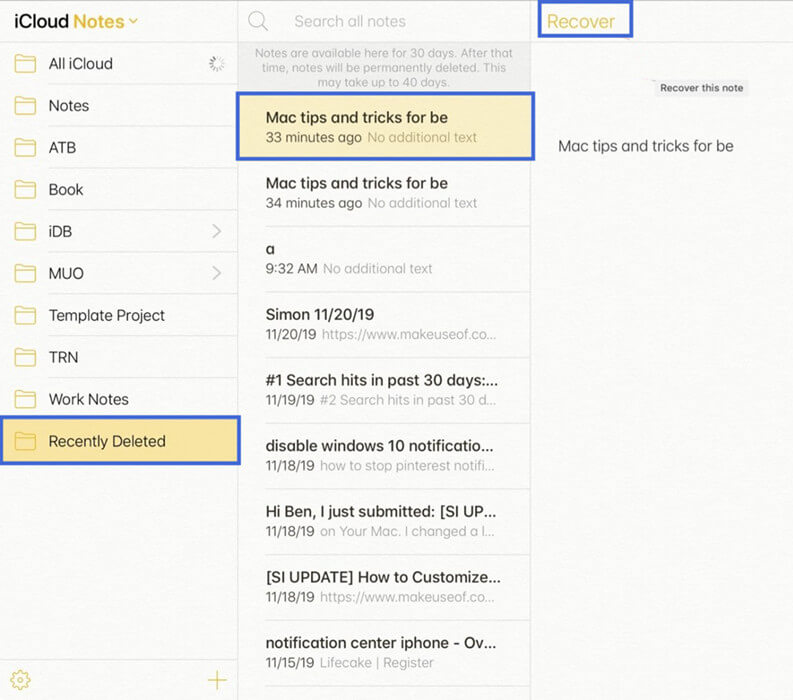
These steps are likely to recover your deleted iPhone notes and you can copy or save them somewhere else now.
Solution 4: Recover Deleted Notes From iTunes Backup
Recovering your lost notes through iTunes backup is an exact method that can help you if you keep backing up your data with iTunes. The technique is helpful as the backup contains your deleted notes.
Steps To Recover From iTunes Backup
- The first step is to connect your iPhone to the computer via a USB cable and open iTunes on your computer.
- Now, you will see an option "Recover Backup" on iTunes homepage. Click on it, and let the process complete.
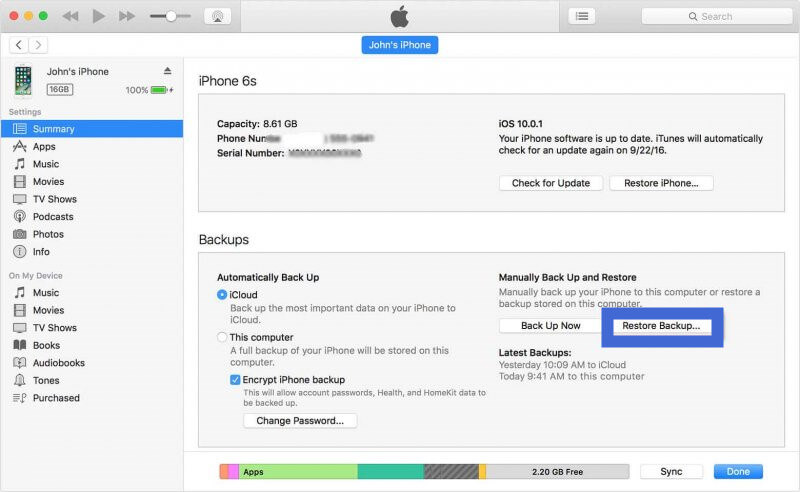
This method will help recover your lost notes from the previous backup but it might also impact your current device data. Therefore, make sure to back up everything on your iPhone before manually restoring its data via iTunes.
Conclusion
There are four solutions mentioned in this post that answer your query, “How to recover permanently deleted notes from iPhone?
Among all these solutions, the most effective is the iFindit tool. It works well and recovers your data quickly. You won't have to lose any other data from your device to recover your notes, and instead, all of your permanently deleted messages will be recovered in no time.
That said, we are ending this post. If you have got any queries in your mind, let us know in the comments section, and we'll get back to you as soon as we can.
Secure Download
