The free version provides only limited sound effects and you can access the in-built features only to a certain extent. Whereas the full version allows you to use all the available functionalities of this program. Upgrade to the desired subscription to enjoy the full version of this program.
High compatibility with macOS and supported by its smooth functioning. You can also receive updates to enjoy advanced versions of this tool.
Problem 1: Work on Sound attributes
· Choose the microphone and headphone device from the Settings option in the MagicVox
· Set the headphone volume control to 1 if the sound parameters are muted.
· If there is no sound, then check with the microphone settings and enable the Hear Myself button.
· Use the Noise reduction button available with the Speaker interface and adjust the levels to remove the noise signals.
· Turn on the Apply Voice Changer button to obtain immediate effects.
Problem 2: Disappearing of Microphone and Headphone in MagicVox
· Open the Sound interface by tapping the ‘Control Panel -> Hardware and Sound’ option. Choose the Microphone and headphone items, disable and enable them.
· Select the output device as Headset and you can also download MaxxAudio software to improve the visibility of the microphone and headsets. The Dell computers offer this software by default and you can reach for it through the search process. Choose the Headset option when addressing the pop-up message about what device is plugged in.
Problem 1: When Discord fails to work with MagicVox.
Ensure the below 4 points are satisfied before stepping into resolving the issue.
· Check whether the MagicVox is installed and works normally.
· Set the Input Device in Discord as MagicVox’s microphone.
· The output devices in both the MagicVox and Discord are the same.
· Disable the Input Sensitivity if you select the Voice activity on Discord as Input Mode. Adjust the volume precisely until you listen to it.
· Finally, click the Let’s Check on Discord.
Problem 2: The blurred sound effects even when the sound attributes are fine with the Discord.
· In the Discord user settings, disable the Noise Suppression in the Voice and Video menu. It is a default setting with the Discord, where the noise suppression feature lowers the unnecessary sounds to make the human voice clear during the meetings and calls. This setting affects the voice changing scenarios.
· Again, in the Discord user settings disable the Echo Cancellation option in the Voice and Video menu.
· As the users’ environment is different this feature helps to overcome the background Sounds.
· Leave the other default settings as it is. If you find anything abnormal then connect with us to make further changes in the Discord User settings.
Click the User icon at the top right side of the tool interface, and the login window appears. Complete the registration by entering the Licensed email and licensed code. (You will receive these credentials soon after the MagicVox purchase process) Proceed with the buy action by costing our purchase page.
It is impossible to change the registered email or UnicTool ID/account. Connect with our support team at support@unictool.com and share your Purchase ID. Our support team will help you to sort out this issue.
· Launch the MagicVox on PC and ensure it toggles in the Window taskbar.
· Install the Fortnite Battle Royale and disclose it.
· Now, click Settings -> Audio-> Voice Chat input device and choose Microphone (Voice changer Virtual Audio Device) as the input. Finally, press the Apply button.
· Start using the MagicVox by choosing your favorite voice while playing the Fortnite.
· Download MagicVox on your PC and launch it. Configure in your system for further use.
· Choose MagicVox as the audio input by selecting the Voice changer Virtual Audio Device in the communication applications like Steam and Discord.
· Now, choose the voice you want to stream when playing the games.
· Download the MagicVox in your system. Ensure the icon toggles in the Windows taskbar.
· Surf the soundboard and voice filter collections from the library and include them in the favorite lists for a quick selection process.
· Launch the League of Legends clients and go to the Settings in the right corner at the top of the system.
· In the Voice option, assign Voice Changer Virtual Audio Device (Microphone) as the input device in the input settings.
· Launch MagicVox.
· Set default option as MagicVox virtual microphone.
· Launch CS: GO and travel with MagicVox.
· Install the MagicVox program in your System.
· Launch the World of Warcraft, and sign in with the account credentials.
· Choose the Options button by tapping the Esc menu
· Connect with the voice settings by hitting the Voice option.
· Turn on the “Enable Voice Chat” checkbox to enable the voice chat.
· Choose Voice Changer Virtual Audio Device as the default device in the Microphone options.
· Tap the Ok button and restart the game to include the changes.
· Install and launch the MagicVox in your system.
· Launch the Second Life, and sign in with the account credentials.
· Disclose the Preferences window by selecting the Me menu » Select Preferences command.
· Tap the Sound & Media category by clicking the Preferences dialog box.
· Choose the Input/Output Devices button in the right pane of the screen and customize the Microphone settings to “Voice Changer Virtual Audio Device”. Save the changes by pressing the OK button and closing the pop-up window.
· Install and launch the MagicVox in your system.
· Choose MagicVox as the audio input by selecting the Voice changer Virtual Audio Device in the communication applications like Steam and Discord.
· Choose your favorite voice to use while playing the game.
· Install and launch the MagicVox in your system.
· Choose MagicVox as the audio input by selecting the Voice changer Virtual Audio Device in the communication applications like Steam and Discord.
· Choose your favorite voice to use while playing the game.
· Install and launch the MagicVox in your system.
· Disclose the Discord app and in the ‘Voice’ menu choose the Input Device. From the drop-down items select the Microphone (Voice Changer Virtual Audio Device).
· Disable the option “Automatically determine input sensitivity”.
· Modify the Sensitivity Settings by speaking into the Microphone and ensure the green notification turns on when you try to speak into it.
· Finally, click the Escape button.
· Install and launch the MagicVox in your system.
· Launch the Skype, and sign in with the account credentials.
· Choose Audio & Video in the Settings menu.
· Choose Microphone (Voice Changer Virtual Audio Device) from the Microphone settings.
· At last, save the changes.
· Install and launch the MagicVox in your system.
· Launch the Zoom app and select the settings option button at the right top of the screen.
· Choose the "Audio" tab and select “Microphone (Voice Changer Virtual Audio Device)" from the drop-down items in the Microphone settings.
· Disable the option “Automatically adjust volume”.
· Next, tap the Test Mic button and adjust the position of your microphone and speak up until the bars appear in the middle. Else, adjust the microphone accordingly. Make necessary changes with the microphone during the Test Mic activity. Now, switch to the MagicVox Virtual Audio Device. Allow the MagicVox Virtual Audio device Microphone at 50%. Finally, close the Settings window.
· Install and launch the MagicVox in your system, Then, launch the Twitch app.
· Select the Settings option in the User name and choose the Audio/Video section. In the Microphone menu, set the microphone as Voice Changed Virtual Audio Device (WDM)
· Finally hit the OK button and close the Settings window. Play the MagicVox while running the Twitch program.
· Install and launch the MagicVox in your system, Then, launch the Xsplit app.
· In the Settings menu, navigate to Device Section. Then, choose Microphone (Voice Changer Virtual Audio Device) in the Microphone source list and select .
· Now, the settings are ready to use the voice changer software with the Xsplit app.
· Install and launch the MagicVox in your system, Then, launch the Streamlabs app.
· Navigate to Editor and choose Microphone (Voice Changer Virtual Audio Device).by adding a new Audio Input Capture.
· The MagicVox Voice Changer takes the control of the mic signal after completing the above steps.
· Type in "Sound” on the Windows Search bar.
· Tap the Sound / Control panel on the right side of the screen.
· Select the Recording tab and tap the Default Device > Properties.
· Hit the Levels tab, then assign the Microphone values as ( 80-100 ) and Microphone Boost as ( 0-10 ).
Ensure you select the same playback device on both the MagicVox setting and Windows/Mac system. The playback settings have to be the same to fix the muted programs that run simultaneously.
Disclose the MagicVox program and click Control panel -> Hardware and Sound -> Sound. Next, change the Microphone to default settings from the Voice Changer Audio Device.
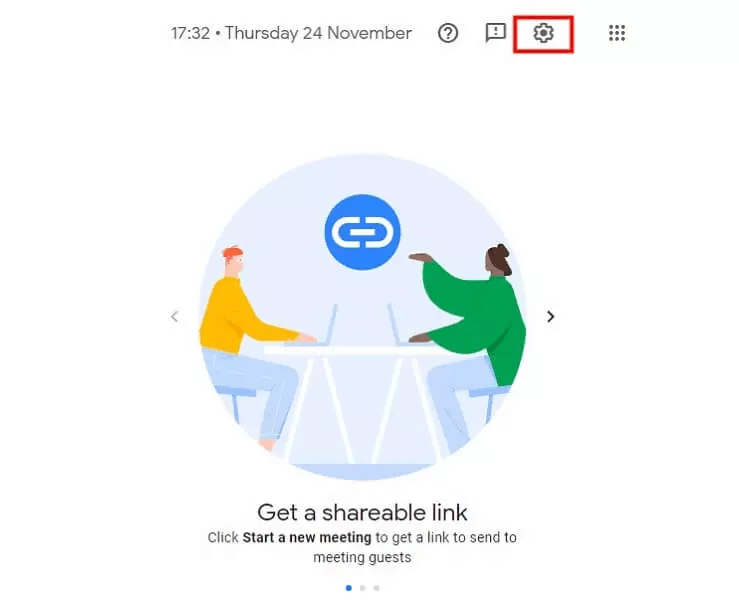
1) Open Google Meet,and click "Settings" on the right corner.
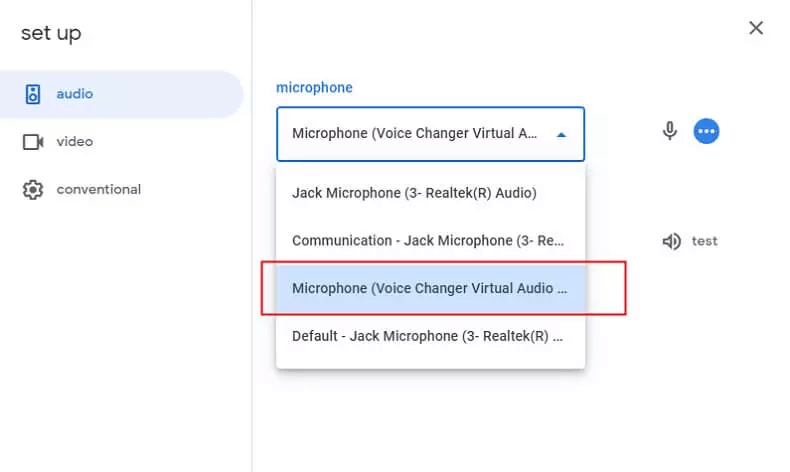
2) In Google Meet settings, choose MagicVox virtual audio device as your microphone. MagicVox virtual device: Voice Changer Virtual Audio Device (WDM)
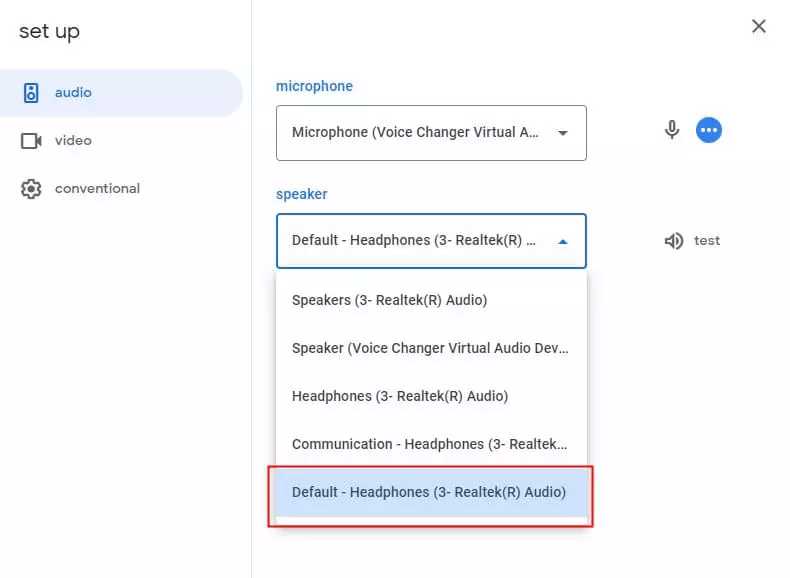
3) Choose your physical headphone device(like headphones) on Speaker setting.
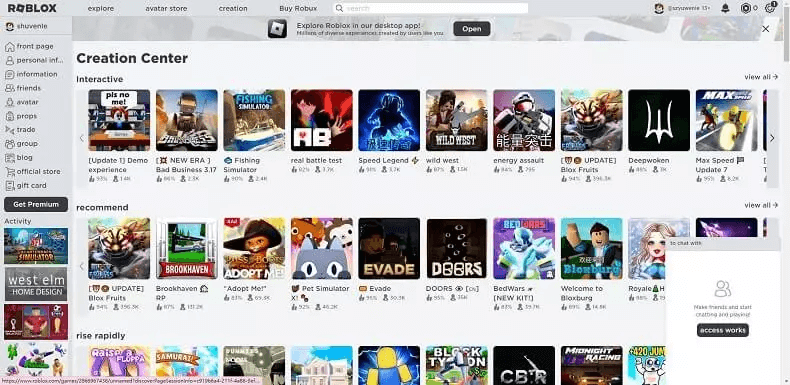
1) Open MagicVox then open Roblox. (If you open Roblox at first, pls close it before open MagicVox.
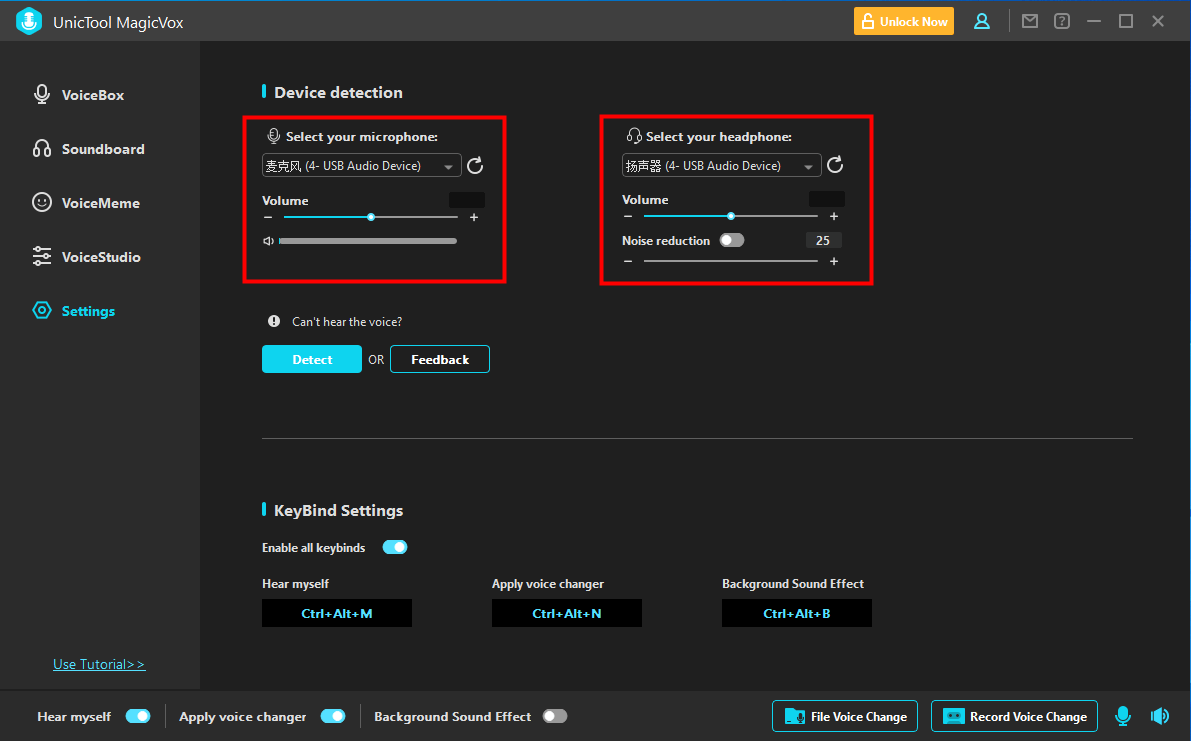
2) Choose microphone and headphone device on MagicVox until it is set correctly. Then open Roblox voice chat, voice changer on Roblox will work.
