Unboxing a new iPhone is thrilling, with its sleek design and upgraded features. However, it's essential to transfer your favorite apps and data to your new device, which can be daunting for some users.
Transferring apps and data is crucial for a seamless transition to your new iPhone. In this guide, we'll cover "how to transfer apps to a new iPhone" using different methods, ensuring you can enjoy your new device with all your favorite apps and data intact.
Part 1. How to Move Apps to New iPhone Using iCloud
Part 2. How to Transfer Apps to New iPhone Using iTunes/Finder
Part 3. How to Transfer Apps to New iPhone Using iTunes/Finder
Part 4. How to Move Apps to New iPhone Using Quick Start
Part 5. How to Transfer Specific Apps and App Data to New iPhone
Part 1. How to Move Apps to New iPhone Using iCloud
iCloud is a cloud storage and cloud computing service provided by Apple, allowing you to store and sync data across all your Apple devices. It's an excellent solution for transferring apps and data to a new iPhone.
Step-by-step guide to transfer apps using iCloud
- 1. Preparing your old iPhone:
- a. Connect to Wi-Fi.
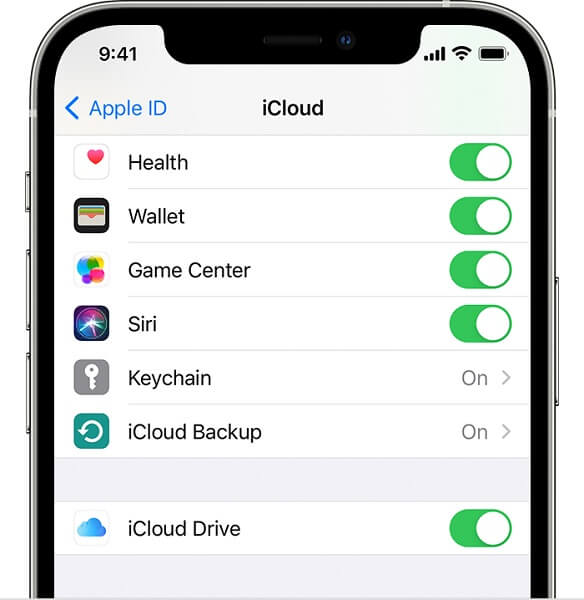
- b. Go to Settings > [your name] > iCloud.
- c. Enable "iCloud Backup" if it's not already on.
- 2. Backing up your apps to iCloud:
- a. In the iCloud settings, tap "Backup Now."
- b. Wait for the backup to complete.
- 3. Setting up your new iPhone:
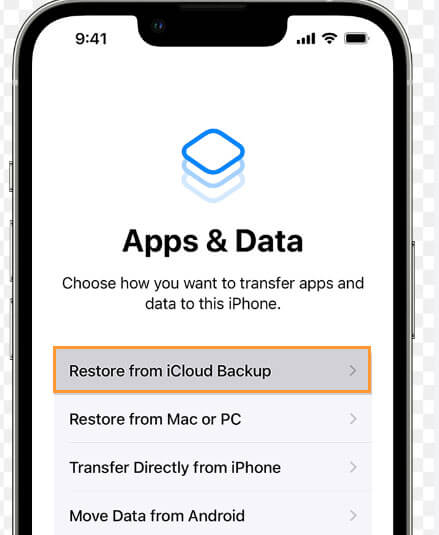
- a. Turn on your new iPhone and follow the on-screen instructions.
- b. When prompted, select "Restore from iCloud Backup."
- 4. Restoring apps from iCloud:
- a. Sign in with your Apple ID and select the latest backup.
- b. Wait for your apps and data to be restored.
Pros
- Easy and convenient. - No need for a computer or cables.
Cons
- Requires a stable Wi-Fi connection. - Limited free storage space (5 GB).
Part 2. How to Transfer Apps to New iPhone Using iTunes/Finder
iTunes (for Windows and macOS Mojave or earlier) and Finder (for macOS Catalina or later) are Apple's official tools for managing and syncing data on your iOS devices. These tools can also be used to transfer apps and data to a new iPhone.
Step-by-step guide to transfer apps using iTunes/Finder
- 1. Preparing your old iPhone:
- a. Connect your old iPhone to your computer.
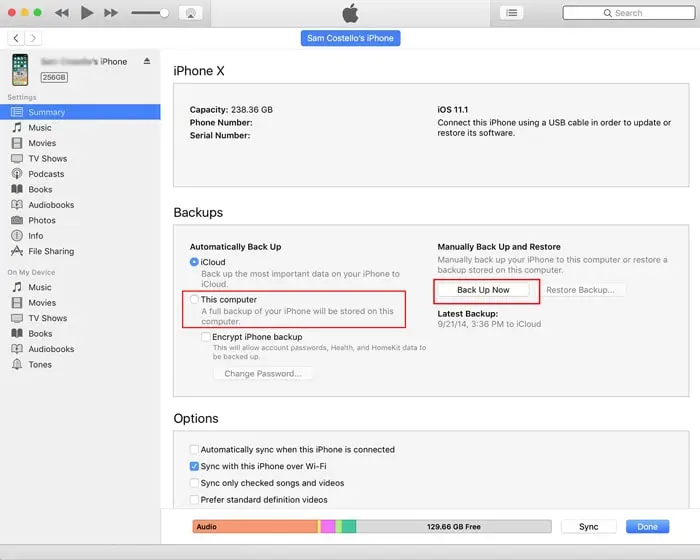
- b. Open iTunes/Finder and select your iPhone.
- 2. Backing up your apps using iTunes/Finder:
- a. Click "Back Up Now" and wait for the backup to complete.
- b. Safely disconnect your old iPhone.
- 3. Setting up your new iPhone:
- a. Turn on your new iPhone and follow the on-screen instructions.
- b. When prompted, select "Restore from iTunes Backup" (for iTunes) or "Restore from Mac or PC" (for Finder).
- 4. Restoring apps from iTunes/Finder backup:
- a. Connect your new iPhone to your computer.
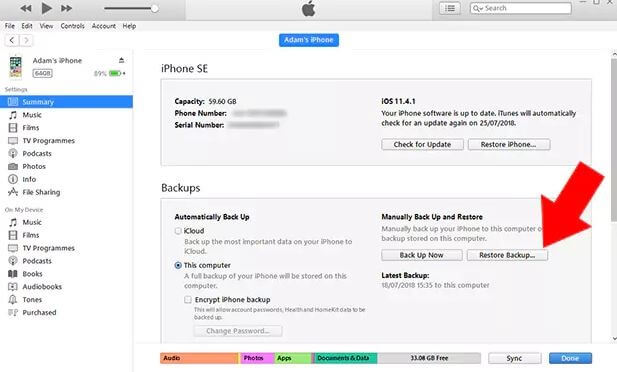
- b. Select your iPhone in iTunes/Finder and click "Restore Backup."
- c. Choose the latest backup and wait for your apps and data to be restored.
Pros: - Faster than iCloud, especially for large backups. - No storage limitations.
Cons: - Requires a computer and cable. - Can be more complicated for some users.
Part 3. How to Move Apps to New iPhone Using Quick Start
Quick Start is an Apple feature designed to simplify the process of setting up a new iPhone. It transfers apps, data, and settings from your old iPhone to the new one using a direct connection between the devices.
Step-by-step guide to transfer apps using Quick Start
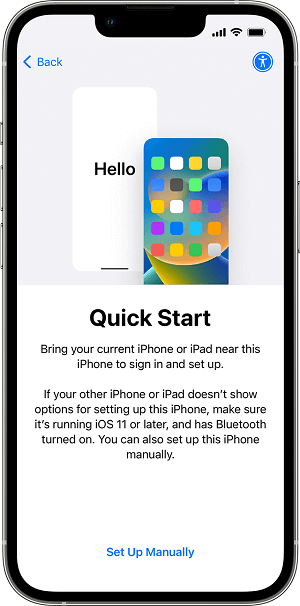
- 1. Preparing both iPhones:
- a. Turn on your new iPhone and place it near your old iPhone.
- b. Make sure both devices have Bluetooth enabled and are running iOS 11 or later.
- 2. Initiating the Quick Start process:
- a. On your old iPhone, a Quick Start prompt will appear, displaying your new iPhone's name.
- b. Tap "Continue" and confirm by scanning the animation on your new iPhone's screen using your old iPhone's camera.
- 3. Transferring apps and data:
- a. On your new iPhone, follow the on-screen instructions to set up Face ID or Touch ID.
- b. Choose to transfer apps and data from your old iPhone.
- c. Wait for the transfer to complete, which may take some time depending on the amount of data.
Pros: - Fast and convenient. - No need for a computer or Wi-Fi connection.
Cons: - Requires both iPhones to be in close proximity. - Limited to devices running iOS 11 or later.
Part 4. How to Transfer Specific Apps and App Data to New iPhone
Sometimes, you may only want to transfer specific apps or app data to your new iPhone. In such cases, you can use built-in features or third-party tools to achieve this.
How to transfer app data using built-in features
- Some apps have built-in cloud syncing features, like iCloud, Google Drive, or Dropbox, to store your data. To transfer data for these apps:
- a. Ensure that your app data is synced on your old iPhone.
- b. Download and install the app on your new iPhone.
- c. Sign in with the same account you used on the old iPhone to access your synced data.
- For apps with no built-in cloud syncing, you can try using the "Files" app on your iPhone:
- a. On your old iPhone, open the "Files" app and locate the app data you want to transfer.
- b. Share the app data with yourself via email or a cloud service like iCloud Drive.
- c. On your new iPhone, download the app, open the "Files" app, and import the app data.
C. How to transfer apps and data using third-party tools
There are several third-party tools, such as UnicTool ChatMover, AnyTrans, iMazing, and EaseUS MobiMover, that can transfer specific apps and app data between iPhones. To use these tools:
All-in-one WhatsApp Transfer
- Transfer WhatsApp from Android to iPhone without Data Loss
- Back up WhatsApp on Android & iPhone to computer free.
- Restore WhatsApp backup from Google Drive to iPhone.
- Export WhatsApp backup to HTML, PDF and CSV/XLS.
105,674 downloads
100% secure
Note: Always research and choose a reputable third-party tool, as some tools may pose security risks or compromise your data.
Part 5. Troubleshooting Common Issues in iOS App Transfer
A. Incomplete app transfer
- Ensure you have a stable Wi-Fi connection for iCloud transfers.
- Make sure your computer and cable are functioning properly for iTunes/Finder transfers.
- Update both iPhones to the latest iOS version to avoid compatibility issues.
B. Lost app data
- Double-check that your backup includes the desired app data.
- For cloud-syncing apps, ensure you sign in with the correct account.
- Contact the app developer for assistance if the app data is still missing.
C. Connection and compatibility issues
- Check your Wi-Fi connection and Bluetooth settings for iCloud and Quick Start transfers.
- Update iTunes/Finder to the latest version and use an Apple-certified cable for iTunes/Finder transfers.
- Ensure your devices meet the system requirements for the chosen transfer method.
D. Tips to avoid common iOS app transfer problems
- Always backup your old iPhone before transferring apps and data.
- Keep both iPhones updated to the latest iOS version.
- Follow the step-by-step instructions provided in this guide to ensure a smooth transfer process.
Conclusion
We've covered various methods on "how to transfer apps to a new iPhone," including iCloud, iTunes/Finder, Quick Start, and app-specific transfers. Each method has its pros and cons, so choose the one that suits your needs and preferences.
With your apps and data successfully transferred, you can now fully enjoy your new iPhone. Explore its features, and take advantage of the seamless experience that Apple devices offer.
Transferring apps to a new iPhone can be simple and hassle-free if you follow the right steps. Always remember to backup your data and choose the most suitable method for your situation, ensuring a smooth transition to your new device.
